


Tuesday 15 April 2008
The final stripdown to nuts and bolts
This was the final stage of the engine disassembly. I dismantled the rear hub, brakes and clutch, then split the casings. This was followed by pulling apart the gears and xmas tree, and removed the piston for scrubbing. Everything then got scrubbed in petrol, including both casing halves in order to clean up the system. When I'd drained the gearbox oil before it was a nasty brown-black colour. I hope that By doing this cleaning to avoid that in future. I also chipped all of the carbon off of the piston and cylinder. On closer inspection of the cylinder head, I found that it had been painted badly in black paint, so I stripped this off with more Nitromores. I am now in the process of rebuilding the engine, replacing all of the old gaskets, oil seals, circlips and nuts with new and shiney ones. I also have bought a new set of sports clutch plates, springs and a pair of sports (grooved) rear brake shoes so that the engine shouldn't need a rebuild for a long long time.
Friday 4 April 2008
Removing the cylinder head, cylinder and exposing the piston
This morning I took off the cylinder head. After scrubbing off thick carbon deposits I exposed the writing on it. It says 90 SS (which I assume is the cylinder from a Vespa SS90, which is good)


The engine, sitting in the middle of my front room

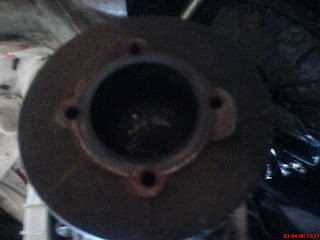
The cylinder, still intact

The cylinder head, after removal and scrubbing

The piston head, still in the cylinder, covered incarbon and other crud

The piston, once the cylinder head has been removed
Now I've had quite a lot of problems with removing the ~30 years of grime coaating this engine. I've been recommended using:
1. Household oven cleaner, which I tried. As it was water based, it made the exposed metalwork rust. not good.
2. WD40, which I tried. Though there's no rust, it sticks to the engine and doesnt wash the crud away.
3. Petrol, which I'm tring at the moment. Seems most effective actually. The combination of a petrol bath, a wire brush and a toothbrush for finer detail work seems to remove the most crud so far, but it is by no means perfect. My cylinder is still covered in crap.

The cylinder in a bucket of petrol, with a toothbrush sticking out of it
Wednesday 2 April 2008
Stripping down the engine, and scraping off the paint
The last few evenings have been consumed by trying to strip the paint off of the engine cover and the petrol tank. I tried using rotary sanding units attached to the end of my drill. This worked really well apart from the nitromors paint stripper gets flicked everywhere, including onto my girlfriend and the cat, and it burns when you get it on you. I also burnt out the motor on the drill. oops.
IF YOU DO THIS DO IT OUTSIDE OR YOU WILL DESTROY YOUR HOUSE. As I did....
This morning, as my car is laid up (bloody DVLA) I removed the rear wheel, exhaust pipe, exhaust manifold and carb manifold. Tonight I plan on taking the head off of the cylinder and having a look inside.

IF YOU DO THIS DO IT OUTSIDE OR YOU WILL DESTROY YOUR HOUSE. As I did....
This morning, as my car is laid up (bloody DVLA) I removed the rear wheel, exhaust pipe, exhaust manifold and carb manifold. Tonight I plan on taking the head off of the cylinder and having a look inside.

Out with the carb... What the hell it this?
After pulling out the carb, I gave it a clean, and found that its some kind of Chinese carb with Deng Ling written on the side. It also has an odd rubber bung where the air filter should be. Im going to buy a 19/19 dell'orto carb from ebay, and bolt on a larger manifold so that I get a power boost. Im also considering a 135cc engine upgrade, but that depends on the state of my cylinder...


Tuesday 1 April 2008
The engine is out
All good,
After disconnecting the gear, clutch and rear brake cables, disconnecting the carb and removing the two pivot bolts from the engine, she dropped from the frame intact. Super. My major problems were removing the petrol tank to get at the carb. The previous owner had attached the petcock with a bent nail so it was a proper bugger to remove. Also, i'm pretty sure my carb isnt spec either i.e. not Dell'orto manufactured. This isnt a major problem because as soon as I get the bike running im going to slap a big fat race carb on her....


After disconnecting the gear, clutch and rear brake cables, disconnecting the carb and removing the two pivot bolts from the engine, she dropped from the frame intact. Super. My major problems were removing the petrol tank to get at the carb. The previous owner had attached the petcock with a bent nail so it was a proper bugger to remove. Also, i'm pretty sure my carb isnt spec either i.e. not Dell'orto manufactured. This isnt a major problem because as soon as I get the bike running im going to slap a big fat race carb on her....


Monday 31 March 2008
Ok, Its a PL-170, what do I need to do to it?
I was now faced with the dilemma of what to do to this Scooter. Should I just get it running again, and pootle around on it, or should I try a full restoration? Well, as its my fist go at anything like this, I decided that a bit of both was in order, with emphasis towards getting her as close to original as possible, but with a little tuning etc. From a bodywork point of view, I decided that I would do a full strip-down, back to the metal. Followed by respraying in a classic creme colour. From a mechanical point of view, I would also do a full engine overhaul, in order to better learn about the workings of the Scooter. So my first mission would be to get the engine out....
First things first...


 The 'Pink Monster' seems to be a bit of an unknown. There are few distinguishing features that correspond with any specific vespa model often seen in England. The Headset seems to be that of a V50 Special. The chassis seems to correspond more with a Primavera 125 as it has a toolbox on the side. After stripping the paint (4 layers thick!) from the VIN number, a V9A1T code was revealed, identifying it as a Vespa 90. The scooter however, looks nothing like a V90. I consulted the knowledgeable types on Vespa Club of Britain forum who kindly identified her as an Indian PL-170 (though it does bear some similarity to a Spanish Motovespa T3).
The VIN number on the chassis

A PL-170 in lovely red

Another PL-170. This is what I'm hoping for in the final product

A Motovespa T3, similar but with a different horncast
Project Rationale
I drive a Mazda MX-3 1.8 V6, which I love, but after acquiring it I realised that I had no idea how to fix it. After being ripped off a couple of times by mechanics I thought it was time to learn a little about engines. So I've bought a Vespa of unknown origin from Empire Classics in Chichester for a mere £200 and decided to get to work.....
Subscribe to:
Posts (Atom)
